Posted on Leave a comment

Two Days Until Induction, and Murphy Has the Car Keys

There are times when Murphy’s Law quietly makes its presence known.

A dropped piece of toast lands butter-side down. The washing machine eats a sock. Something you urgently need disappears moments before you need it.

Then there are times when Murphy checks the calendar, notices that induction day is approaching, and decides to personally disable the entire family transport fleet.

That is roughly where we find ourselves today.

It Started With a Starter Motor

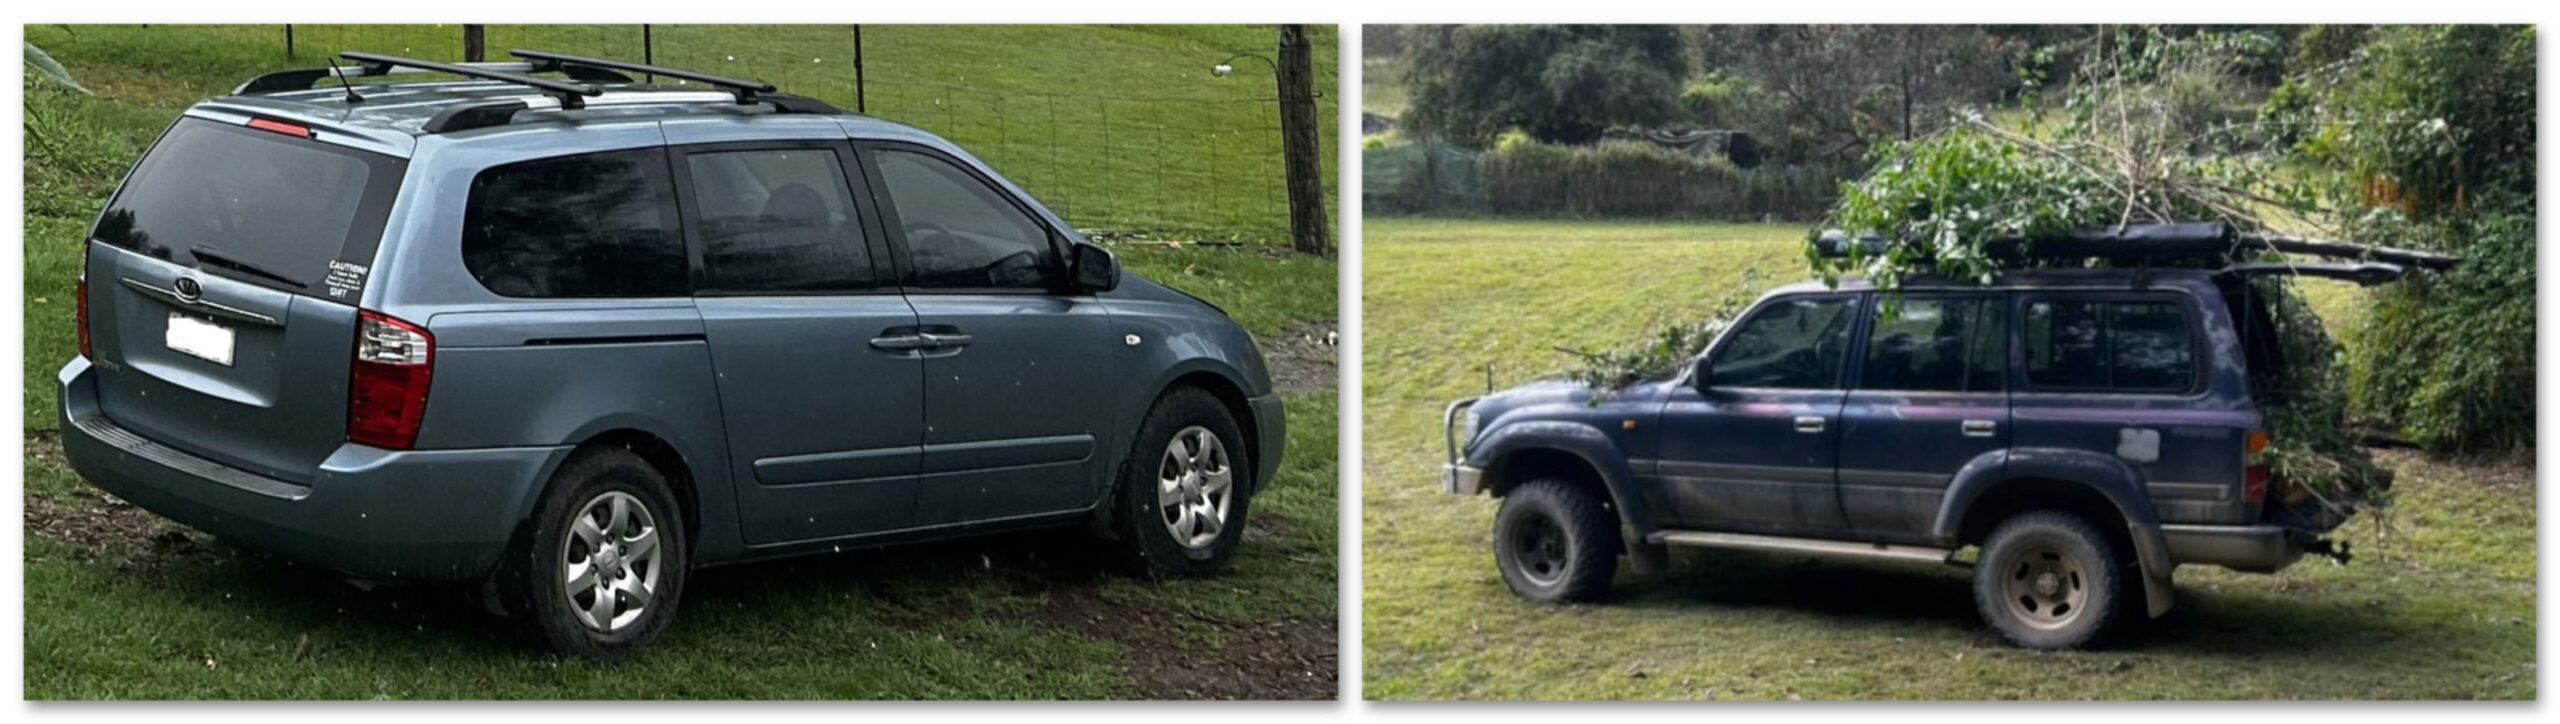
The first sign of trouble arrived on 31 July, when the starter motor in our 2009 Kia Grand Carnival officially resigned from its position within the vehicle.

With approximately 311,000 kilometres behind it, our 2009 Kia Grand Carnival has accumulated quite a maintenance history over the years. A failed starter motor was inconvenient, but it was also a reasonably straightforward problem to identify.

The replacement process came with a complication of its own.

The starter motor that came out of the Carnival had a 10-tooth drive. The replacement starter motor had an 8-tooth drive.

Because apparently even replacing a clearly failed component cannot happen without Murphy adding a small mystery to the job.

The replacement went in, the Carnival started and, strangely enough, it now sounds quieter while starting than it did before.

We could have accepted that as the conclusion of the matter.

Murphy considered it an opening act.

The Carnival Continues Its Resignation Process

Not long after the starter motor was replaced, the Carnival developed two more significant problems at the same time.

The first problem announced itself through the brakes.

The brake pedal became unusually hard to push, stopping the vehicle required considerably more effort than it should, and a constant hissing sound could be heard from inside the cabin whenever the pedal was pressed.

After working through several checks, the evidence pointed rather decisively towards a failed brake booster.

That would have been enough excitement on its own.

Unfortunately, the Carnival’s torque converter also appears to have developed ideas of its own.

Once the vehicle warms up, it continues trying to drive forward while stopped. It shudders, threatens to stall and requires shifting into Neutral to settle it down.

This is not ideal behaviour from any vehicle, but it becomes particularly inconvenient when that vehicle is supposed to help transport a rather large family to and from hospital in the immediate future.

We have therefore reached the reasonably confident conclusion that the Carnival is suffering from two simultaneous faults: a failed brake booster and a separate torque-converter issue.

Excellent timing.

Surely the LandCruiser Will Behave

Fortunately, the Carnival is not our only vehicle.

My work truck is an 80 Series LandCruiser. It is big, tough and generally willing to keep moving despite whatever life throws at it.

Naturally, Murphy noticed that too.

The LandCruiser’s contribution began with not one, but two flat tyres.

Apparently, one flat tyre would have been an inconvenience. Two flat tyres demonstrated commitment.

Then we discovered that rats had been enjoying a light snack beneath the bonnet. Of all the possible food sources available to them, they had selected automotive wiring.

Perhaps copper has nutritional benefits of which I am unaware.

Once the local rodent population had completed its electrical work, the indicator relay decided that it had also done enough indicating for one lifetime and promptly packed it in.

At this point, the LandCruiser had endured two flat tyres, rat-chewed wiring and a failed indicator relay.

Surely that would be enough.

Murphy disagreed.

Another Starter Motor Joins the Protest

Today, with induction only two days away, the LandCruiser’s starter motor decided that it would also like to resign from its position.

The key was turned.

The truck refused to start.

This was not an acceptable response.

Fortunately, D1 was available to conduct negotiations.

These negotiations involved a tyre iron.

After a short but firm conversation between the Tyre Iron of D1 and the starter motor, the LandCruiser reconsidered its position and returned to work.

Some people refer to this as striking the starter motor to temporarily free a sticking internal component.

We prefer to think of it as mechanical conflict resolution.

The important point is that the truck started, although its starter motor is now very clearly on notice.

There is also something almost poetic about the situation.

Murphy began this entire sequence with the starter motor in the Carnival. Now, two days before induction, he has returned to where he began and turned his attention to the starter motor in the LandCruiser.

Apparently, he enjoys a story with symmetry.

Murphy’s Pre-Induction Checklist

With only two days remaining until our Bubbas’ induction day, our recent transport history can be summarised as follows:

  • One resigned Carnival starter motor
  • One replacement starter motor with two fewer teeth
  • One failed Carnival brake booster
  • One separate Carnival torque-converter problem
  • Two flat LandCruiser tyres
  • Rat-chewed LandCruiser wiring
  • One failed indicator relay
  • One temperamental LandCruiser starter motor
  • One tyre iron with a proven record in mechanical negotiations
  • Absolutely impeccable timing

Anything that can go wrong, will go wrong.

Preferably all at once.

Preferably immediately before an important event.

Two Days to Go

There is something almost impressive about the precision of it all.

These vehicles have had months in which to misbehave. They could have spread their problems out politely over several weeks. They could have waited until after the hospital trips were completed and everyone was safely back at home.

Instead, they appear to have coordinated their industrial action for the final days before induction.

The Carnival has made its demands.

The LandCruiser has submitted its list of grievances.

The rats have contributed their unsolicited modifications.

D1 has responded with a tyre iron.

For the next two days, we would sincerely appreciate it if every remaining mechanical, electrical and rubber component in both vehicles could simply continue performing its assigned function.

There is no need for initiative.

There is no need for further surprises.

Just start, steer, indicate, stop and keep the air inside the tyres.

That is all we ask.

Murphy has already had his turn.

Induction Day belongs to the Next Generation.


Posted on Leave a comment

Nicest Code: A Local HTML Code Cleaner for Copied Content

Copying formatted content should be simple.

You select the content you want, copy it, paste it into a website or editor, and continue working.

Unfortunately, the HTML behind that content can be far less simple.

Content copied from AI platforms, visual editors and other web interfaces may contain presentation metadata, generated class names, interface-specific attributes, unnecessary wrappers and excessive whitespace. Much of it is invisible in the visual editor, but it becomes obvious when the HTML source is inspected.

That is the problem Nicest Code was created to address.

Nicest Code is a local HTML code cleaner for Chrome. It removes approved presentation metadata and whitespace clutter while preserving the source you intended to keep.

It does not send copied source to Jays n Dees for cleaning, rewrite the entire document or guess which code might be unnecessary. Instead, it applies targeted rules and gives you the opportunity to inspect every change.

Why Copied HTML Can Become Messy

When content is copied from a web interface, the clipboard may contain more than the visible headings, paragraphs, lists and links.

Depending on the source, copied HTML can include:

  • generated data-* attributes
  • presentation-related class tokens
  • interface-specific wrappers
  • accessibility or directionality attributes
  • empty elements
  • excessive blank lines and spacing
  • metadata used only by the original platform
  • structures added during copying rather than intentionally written

Some of this markup may be useful. Some may be harmless. Some may create unwanted styling or leave the destination source filled with information that does not belong there.

The difficult part is not merely removing code.

The difficult part is removing only what has been approved for removal.

A Non-Destructive Cleaning Workflow

Nicest Code keeps the untouched Original source separate from the Modified result.

Source can be added by:

  • pasting from the clipboard
  • opening a supported file
  • dragging a supported file into the extension

The original remains available for comparison while the selected cleanup rules are applied to a separate working copy.

This makes the process reviewable. You can inspect the result, read the change report and decide whether to copy or save the modified source.

Nicest Code does not overwrite the original file. Its Save As workflow creates a separate cleaned copy.

General HTML Cleanup

The General HTML Cleanup preset provides a controlled starting point for source that contains common presentation clutter.

Depending on the selected options, it can assist with:

  • targeted attribute removal
  • complete class-token removal
  • approved empty-element cleanup
  • excess whitespace reduction
  • selected semantic controls
  • selected directionality controls

The available controls vary by licence edition.

The purpose is not to produce the shortest possible source. It is to remove selected clutter while preserving the underlying content and structure.

Evidence-Based Platform Presets

Different platforms can introduce different copying artefacts.

Nicest Code includes presets developed from controlled source-copy testing rather than assumptions about what a platform might produce.

The free Lite edition includes:

  • General HTML Cleanup
  • Copied ChatGPT HTML

Standard and Ultimate add presets for:

  • Gemini
  • Claude
  • Perplexity

These presets target patterns observed during controlled copying tests. They are not intended to remove every attribute or class appearing in a document.

Targeted Attribute and Class Removal

Nicest Code distinguishes between an attribute and an individual class token.

For example, an element may contain several classes:

<section class="sample-card featured generated-wrapper">

A targeted rule can remove the complete generated-wrapper token without deleting the entire class attribute or altering sample-card and featured.

This matters when part of a class list is intentional and part was introduced by the copying platform.

Standard and Ultimate also provide custom quick-removal fields for supported targeted cleanup tasks.

Protection for PHP, Scripts and Styles

HTML files do not always contain HTML alone.

A PHP template may include server-side blocks. A document may also contain JavaScript inside a script element or CSS inside a style element.

Nicest Code protects:

  • PHP blocks
  • script contents
  • style contents

It does not attempt to format PHP, JavaScript or CSS.

This is deliberate. Nicest Code is an HTML source cleaner, not a general-purpose code formatter or speculative code-rewriting system.

Detailed Change Reports

Cleaning source without knowing what changed can create a different kind of problem.

Nicest Code produces a numbered change report showing the targeted modifications it made. Reports include original source line references to help locate affected content.

This makes it easier to answer practical questions such as:

  • Which attribute was removed?
  • Which class token was deleted?
  • Where did an empty element occur?
  • What whitespace cleanup was applied?
  • Did a particular preset make any changes?

If no supported changes are required, the extension reports that outcome rather than pretending work was performed.

Undo, Reset, Copy and Save

The cleaning workflow includes controls for reviewing and managing the result:

  • Undo reverses the most recent supported change operation.
  • Reset restores the working result from the untouched Original.
  • Clear removes the current source from the workspace.
  • Copy places the Modified source on the clipboard.
  • Save As creates a separate cleaned file without replacing the original.

These controls are intended to keep the user in charge of the source throughout the process.

Lite, Standard and Ultimate

Nicest Code can be installed and used in Lite mode without a licence key.

FeatureLiteStandardUltimate
General HTML CleanupIncludedIncludedIncluded
Copied ChatGPT HTML presetIncludedIncludedIncluded
Original and Modified comparisonIncludedIncludedIncluded
Change reports and source line referencesIncludedIncludedIncluded
Undo, Reset, Copy and Save AsIncludedIncludedIncluded
Gemini, Claude and Perplexity presetsUnavailableIncludedIncluded
Semantic and directionality controlsUnavailableIncludedIncluded
Custom quick-removal fieldsUnavailableIncludedIncluded
Make the Nicest Code modeUnavailableIncludedIncluded
Local batch processingUnavailableUnavailableIncluded
Provider-evidence detectionUnavailableUnavailableIncluded
Custom rule packsUnavailableUnavailableIncluded

Standard supports one activated installation.

Ultimate supports up to ten activated installations and adds local batch processing for up to 100 supported files or a combined total of 50 MB. It can also produce combined reports, create cleaned ZIP downloads and manage custom rule packs.

Standard and Ultimate are optional lifetime licence upgrades.

Local Processing and Privacy

Source pasted into Nicest Code, opened from a file or added through drag-and-drop is processed locally on the device.

The source is not sent to Jays n Dees for cleaning.

Settings are also stored locally.

Paid-edition licence operations require limited communication with the Jays n Dees licensing service. These requests contain only the information needed to perform the licensing action, such as the licence credentials, a random installation identifier, the extension version and the requested action.

The complete handling details are available in the Jays n Dees Privacy Policy.

What Nicest Code Does Not Do

Nicest Code is purposefully limited.

It does not:

  • rewrite the entire document
  • reserialise all supplied HTML
  • format PHP
  • format JavaScript
  • format CSS
  • remove arbitrary code because it appears unnecessary
  • decide whether your content is factually correct
  • repair every possible HTML error
  • replace manual review

The extension removes supported artefacts according to selected rules. The user remains responsible for reviewing the result and confirming that it is suitable for the intended destination.

Nicest Code is one of several focused Jays n Dees browser extensions, each designed to solve a specific practical problem.

Supported Files

Nicest Code supports the following source file types:

  • HTML
  • HTM
  • PHP
  • TXT

Google Chrome with Manifest V3 extension support is required.

A network connection is only required for paid-edition licence activation and periodic licence verification. The source-cleaning process itself remains local.

Who Is Nicest Code For?

Nicest Code may be useful for:

  • WordPress users working in the Code Editor
  • website owners copying formatted AI responses
  • developers reviewing copied HTML fragments
  • content managers moving material between platforms
  • testers comparing source-copy behaviour
  • anyone who wants cleaner copied HTML without surrendering control of the source

It is particularly useful when the visible content looks correct but the underlying HTML contains unexplained metadata or presentation clutter.

Nicest Code Is Now Available

Nicest Code v0.8.0 is now available from the Chrome Web Store.

The free Lite edition includes the complete core single-source workflow, General HTML Cleanup and the Copied ChatGPT HTML preset.

Standard and Ultimate lifetime licence upgrades are available through the Jays n Dees e-Store for users who need additional presets, controls, batch processing or custom rule packs.

Install Nicest Code from the Chrome Web Store

View Nicest Code Standard and Ultimate licence upgrades

Copied HTML does not always need to be completely rewritten.

Sometimes it just needs a careful, transparent clean.


Posted on Leave a comment

A Simple 2-Stroke Fuel Mix Calculator for Everyday Equipment

Mixing fuel for a 2-stroke engine is not particularly complicated.

At least, it should not be.

You have a quantity of fuel, a required fuel-to-oil ratio, and an amount of 2-stroke oil that needs to be added. The calculation itself is straightforward, but it becomes surprisingly easy to second-guess when you are standing beside a mower, chainsaw, brushcutter, blower or another piece of equipment with a fuel container in front of you.

Was that 25:1 or 40:1?

How much oil is needed for this amount of fuel?

Was the measurement calculated using litres, US gallons or UK gallons?

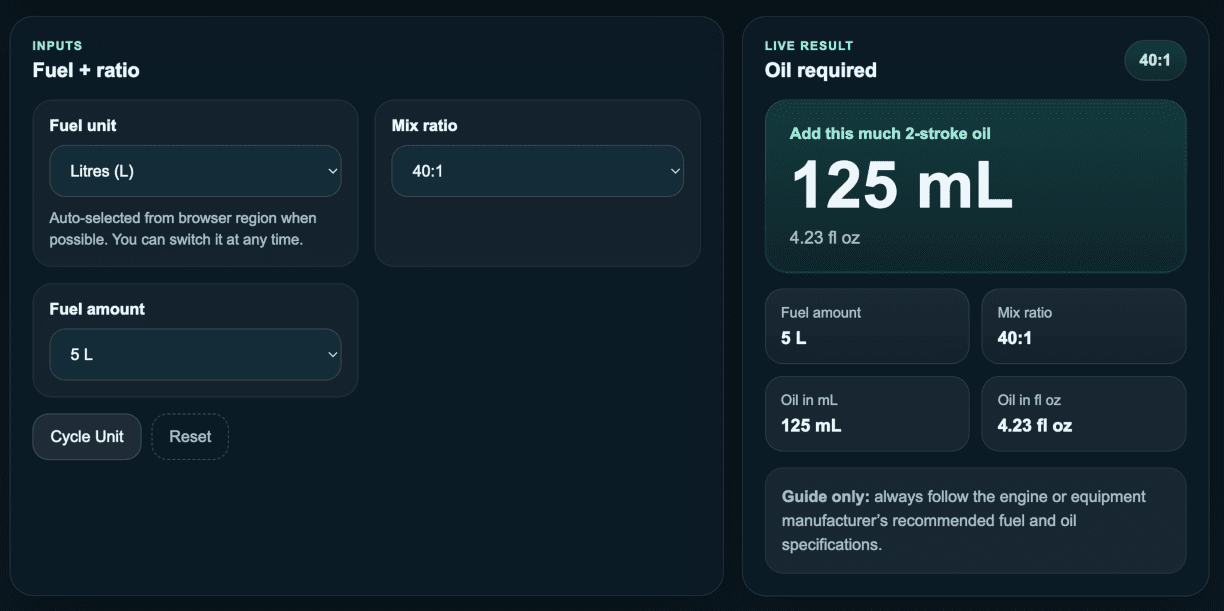
Rather than repeatedly looking up conversion tables or reaching for a calculator, I created the Jays n Dees 2-Stroke Fuel Mix Calculator.

What the Calculator Does

The calculator works out how much 2-stroke oil is required for a selected amount of fuel and fuel-to-oil ratio.

You choose:

  • the unit used to measure the fuel
  • the required mixing ratio
  • the amount of fuel being prepared

The calculator then displays the corresponding oil quantity.

It supports:

  • litres
  • US gallons
  • UK gallons
  • common fuel-to-oil ratios
  • custom ratios
  • preset fuel quantities
  • custom fuel quantities

This means it can be used with a range of equipment and measuring systems without manually converting everything first.

Why the Different Gallon Types Matter

One reason fuel calculations can become confusing is that a gallon is not always the same quantity.

A US gallon and a UK imperial gallon are different sizes. Using the wrong gallon measurement can therefore produce the wrong oil quantity, even when the mixing ratio itself is correct.

The calculator treats litres, US gallons and UK gallons as separate units.

Where possible, it uses the browser region to select a likely starting unit, but that selection can be changed at any time. There is also a Cycle Unit button for quickly moving between the available measurement systems.

Common and Custom Mixing Ratios

Many pieces of 2-stroke equipment use familiar ratios such as 25:1, 40:1 or 50:1.

The calculator provides common ratio choices for convenience, but it is not limited to those options. A custom ratio can be entered when a particular engine or manufacturer specifies something different.

For example, entering 25 represents a fuel-to-oil ratio of 25:1.

This flexibility is useful because not every 2-stroke engine uses the same mixture. Older equipment, newer equipment and specialised engines may all have different requirements.

The calculator does not attempt to decide which ratio your equipment needs. That information must come from the equipment manufacturer, instruction manual or another reliable specification for the engine.

Its job is to calculate the oil quantity after you provide the correct ratio.

Saving Frequently Used Mixtures

Most people who regularly use 2-stroke equipment tend to prepare the same few mixtures repeatedly.

You may always mix:

  • the same fuel quantity
  • in the same unit
  • at the same ratio

The calculator allows useful combinations to be saved as favourites for quicker reuse.

These favourites are stored locally on the device rather than being attached to an online account. This keeps the feature simple and avoids requiring registration merely to save a common calculation.

Once saved, a favourite can be selected again without rebuilding the mixture from the beginning.

Available Online and Offline

The calculator is built as an installable Progressive Web App, commonly shortened to PWA.

That means it can be opened through a web browser and, on supported devices and browsers, installed for more app-like access. It is also designed to remain available offline after it has been loaded and installed correctly.

Offline access is particularly useful for this kind of tool.

Two-stroke equipment is often used in sheds, gardens, paddocks, workshops and other places where an internet connection may be weak or unavailable. A calculator that stops working when the connection disappears would be far less useful.

The saved favourites also remain on the device for convenient reuse.

A Small Tool for a Specific Job

The 2-Stroke Fuel Mix Calculator is deliberately focused.

It is not an equipment-management platform, maintenance tracker or complicated workshop system. It does not require an account, and it does not try to recommend a mixing ratio without knowing the engine involved.

It performs one practical job:

It calculates the amount of 2-stroke oil required for the fuel quantity and ratio you select.

Sometimes that is all a tool needs to do.

Always Check the Manufacturer’s Requirements

The calculator is provided as a mixing guide.

Always confirm the correct fuel type, oil type and fuel-to-oil ratio specified by the engine or equipment manufacturer before preparing a mixture.

Using the wrong ratio or unsuitable oil may affect performance or damage equipment. If the instructions printed on the equipment differ from information found elsewhere, follow the applicable manufacturer documentation.

Once the correct ratio is known, the calculator can take care of the maths behind it.

Try the Free Calculator

The Jays n Dees 2-Stroke Fuel Mix Calculator is available free through the Jays n Dees website.

Open the 2-Stroke Fuel Mix Calculator

Choose the fuel unit, select or enter the required ratio, enter the amount of fuel, and the calculator will show how much oil to add.

Save the combinations you use regularly, and the next mixture should take only a few moments to calculate.

Posted on Leave a comment

An Undocumented Site Shows Colour: Gold on Rock, Strange Blobs, and More Questions

I am keeping this location unnamed for now.

For the moment, I am only referring to it as an undocumented site.

That is not because I am trying to make it sound mysterious for the sake of it. It is because I want more time to properly observe the ground, the creek features, the surrounding rock, and the material coming out of the area before I draw too much attention to it.

Some places deserve more patience.

This one feels like it might be one of them.

On this trip, I found several interesting pieces that are worth documenting. Some may turn out to be nothing. Some may become useful clues. One piece in particular has me more excited than anything I have found so far.

It is not a nugget.

It is not a vial full of gold.

But it is a small shard of rock with what appears to be visible gold-coloured material on it.

And under sunlight, shade, and magnification, it looked glorious.


Why I Am Keeping the Site Undocumented

I have mentioned some fossicking locations in general terms before, but I am being more careful with this one.

This undocumented site has enough interesting features that I want to spend more time with it before saying too much.

There are creek features I want to observe properly. There are different rock types showing up. There are possible flecks. There are quartz pieces that look different from what I have been seeing elsewhere. There are odd metallic-looking materials that need more careful inspection. There are also strange slag-like blobs that may be connected to historical activity, processing waste, or something else entirely.

In other words, this is not just a place where I happened to pan a bit of dirt.

It is a place that has started giving me questions.

That is enough reason to slow down.

The goal of this gold experiment series is to document the learning process, not to turn every possible location into a public target. So for now, this site stays general.

I may refer to it again in future posts, but I will keep the exact location out of it until I have a much better understanding of what I am actually looking at.


A Proper Specimen Moment

The most exciting find from the day was a small shard of rock with visible gold-coloured material on it.

I am still being careful with the wording here. I am not calling it confirmed gold just because it looks exciting.

But this is the most convincing piece I have found so far.

I looked at it in sunlight.

I looked at it in shade.

I checked it from different angles.

I also inspected it under magnification up to 35x.

It still looked good.

Very good.

The colour did not vanish when the angle changed. It did not behave like one of those shiny distractions that flashes once and then disappears. It held its appearance well enough that I have kept it aside as a proper specimen.

This felt different from spotting a possible fleck in the pan.

A fleck in the pan is exciting, but it is easy to second-guess. It might move. It might be tiny. It might be hard to photograph. It might look different once the light changes.

This was different because the material was sitting on rock.

It could be inspected.

It could be photographed.

It could be compared in different light.

For this stage of my learning, that felt like a real milestone.


Not a Nugget, But Still a Milestone

There is a temptation in gold fossicking to measure everything by the size of the find.

A nugget would be exciting.

A large flake would be exciting.

A decent vial of colour would be exciting.

But sometimes the value of a find is not just its size.

Sometimes the value is in what it teaches.

This small shard of rock matters because it gives me something physical to study. It gives me something I can photograph, inspect, compare, and possibly show to someone more experienced later.

It also changes how I think about the undocumented site.

Before this, the site was interesting.

Now it feels more promising.

That does not mean I have found a rich patch. It does not mean the area is full of gold. It does not mean every rock from there is worth smashing apart.

It simply means the site has produced enough evidence to justify more careful attention.

For me, that is a good result.


The Buttery Yellow Seam Material

Another interesting piece came from quartz that was broken apart.

Along a seam between quartz and granite, I found a buttery yellow material.

The colour stood out immediately.

It also held its colour in sunlight, shade, and from different angles, which made it more interesting than a simple flash of mica or a quick reflection.

But the behaviour of the material makes me cautious.

I was able to scratch some of it off with a knife, but when pressure was applied, it crumbled rather than bent, flattened, or deformed.

That matters.

Native gold is soft, but it is also malleable. If it is pressed or scraped, it tends to flatten or smear rather than crumble into powder or fragments.

This material did not behave that way.

There is also evidence of iron staining on the same rock material, which adds another layer of possibility. It may be related to weathering, iron-rich alteration, sulfide breakdown, or some other mineralised material along the seam.

At this stage, I am not treating it as gold.

I am treating it as an unknown yellow seam material worth documenting.

It may turn out to be nothing important.

It may turn out to be a useful clue about the rock and mineral environment in that area.

Either way, it is staying in the specimen pile for now.


Quartz With Green Colouring

One of the other interesting rocks from the day had quartz with green colouring in sections of it.

That stood out because it was not something I had been seeing much in my previous fossicking material.

I do not know yet what is causing the green colour.

It could be staining.

It could be mineralisation.

It could be something completely ordinary that only looks exciting because I am still learning what I am looking at.

That is the tricky part of this whole process.

When I first started, anything shiny or colourful felt like it had to mean something. Now I am trying to be more careful. Interesting does not automatically mean valuable. Different does not automatically mean gold-bearing.

But it is still worth documenting.

The green sections in the quartz made the piece stand out enough to bring home for closer inspection. I want to look at it under magnification, photograph it properly, and compare it with other material from the same general area.

For now, it is another clue.

Not proof.

Just a clue.


A Shiny Copper-Coloured Chunk

Another piece I brought home was a chunk of material with a shiny copper-like colour.

At first glance, it caught my attention because the colour was so strong.

The obvious thought was copper.

But when I tested it physically, it did not behave the way I would expect soft copper to behave. It did not bend or deform easily.

That does not mean it is not copper-bearing. It also does not mean it is valuable. It simply means I do not know what it is yet.

It could be a copper-coloured mineral.

It could be a stained piece of rock.

It could be a harder mineral with a coppery appearance.

It could be something completely ordinary wearing a very convincing disguise.

That is why I brought it home.

A lot of this learning process is about building a better mental library of what different materials look like, how they behave, and what they are not.

The copper-coloured piece may not be important.

But it looked unusual enough to keep.


A Couple of Possible Flecks

I also found a couple of possible flecks during the day.

As usual, I am being cautious with the wording.

They looked interesting enough to keep, but I am not calling them confirmed gold yet.

I have learned that tiny material can be deceptive, especially when the light is changing, the pan is wet, and there are shiny distractions mixed through the concentrates.

Still, possible flecks matter.

Even if they are tiny, they help build a picture of what the site may be producing. One possible fleck on its own does not prove much. A few possible flecks, interesting rock, quartz veins, yellow seam material, and visible gold-coloured material on a rock shard together make the site much more interesting.

That is why I am documenting everything.

The small pieces matter because they are part of the wider pattern.


The Strange Silvery Balls

Another recurring mystery has been the small silvery balls I have been finding in some of my material.

At first, I thought they behaved more like solid balls. Some could be picked up with tweezers and moved around carefully, which made me question whether they could be mercury at all.

Then I noticed something stranger.

When one was held with slightly more than normal tweezer pressure, it distorted in shape. With a little more pressure, it slipped out of the grip of the tweezer points, reformed as a ball, and lost a small chunk as it did.

After a few swirls around the pan with the other concentrates, the smaller chunk appeared to start forming into its own little ball.

All of this happened underwater.

The confusing part is that the balls still do not always join back together. I have seen two of them sit side-by-side, even touching, without merging into one.

So I am not claiming to know exactly what they are.

They may be mercury.

They may be amalgam.

They may be some other soft metallic material.

They may be coated, contaminated, or mixed with fine material that changes how they behave.

What I do know is that they are unusual enough to treat seriously.

They are non-magnetic. They can behave partly solid and partly fluid-like under pressure. They reform into rounded shapes. They are showing up more than once.

That is enough for me to keep them completely separate from the rest of my gear and samples.

For now, I am treating them as suspected mercury, possible amalgam, or unknown silver metallic material.

They are stored underwater in a dedicated container and will not be heated, crushed, smelted, acid-cleaned, or casually tested.


Why I Am Not Experimenting With the Silvery Material

It is tempting to want an answer immediately.

I would like to know exactly what these silvery balls are.

But I am not going to find out by playing around with them.

I have already decided that the safest approach is containment, separation, and proper identification.

That means:

  • They stay underwater.
  • They stay sealed.
  • They stay labelled.
  • They stay away from normal fossicking gear.
  • The dedicated snuffer and storage container will not be used for anything else.
  • They will not be heated.
  • They will not be smelted.
  • They will not be treated with acid.
  • They will not be crushed.
  • They will not be mixed back into other samples.

Until I know what they are, they remain suspicious material.

That might sound overly cautious, but old goldfield areas can contain all sorts of leftovers from historical activity. I would rather be too careful than too casual.


Slag-Like Blobs and Fused Material

The site also produced some strange blobs of material that are worth documenting separately.

These are different from the silvery balls.

They do not look like ordinary creek stones.

They have numerous bubbles, pits, and pockmarks across their surfaces. In many places they have a glassy appearance. Some surfaces look blobby or fused, almost like material that has melted, cooled, and weathered over time.

The colours vary across the pieces. I have seen black, brown, rusty brown, grey, orange-red, and other colours around that general range.

Some of the blobs also appear to have small rock particles trapped inside them.

There are also layering lines or flow-like lines around parts of the surfaces.

They do not feel especially heavy for their size, but that may be because the material is full of small voids or bubbles.

At this stage, I am describing them as slag-like fused material or possible historic waste material.

I am not calling them ore.

I am not calling them proof of gold.

But they are unusual enough to keep and document.


Could the Slag-Like Blobs Contain Gold?

The honest answer is: possibly, but I am not assuming they do.

If these blobs are related to historical processing waste, they could theoretically contain trapped metal particles, sulfide fragments, crushed rock particles, or even tiny traces of gold.

That does not mean they are worth anything.

It does not mean they are gold-bearing.

It does not mean they should be crushed and processed without thinking.

It simply means they are interesting enough to keep aside until I understand them better.

If the old processes were imperfect, some valuable material may have been lost into waste. But if these pieces are furnace waste, clinker, industrial debris, or some other fused material, the contents could be completely different.

They could contain nothing useful at all.

They could also contain things I do not want to spread, breathe, dissolve, heat, or mix through my normal equipment.

So for now, they are not going into the pan as ordinary concentrates.

They are being treated as specimens and unknown material.

I may eventually have one tested or identified properly before deciding whether any of it is worth crushing or processing.


Tailings, Slag, and the Problem With Names

One thing I am learning is that the words matter.

I have sometimes thought of strange waste material as “slag”, but that may not always be the correct term.

A stamping battery mainly crushed ore. That kind of process produced tailings – crushed rock, sand, slimes, heavy residues, and material left after gold recovery.

True slag is more specifically linked with smelting or high-temperature furnace processes.

So when I find strange historic-looking material near old gold areas, I need to be careful with the label.

It might be battery tailings.

It might be fused waste.

It might be clinker.

It might be old industrial rubbish.

It might be material that has been moved and mixed by water over time.

It might be a combination of several things.

That is why I am describing these pieces visually before trying to name them too confidently.

Glassy.

Pocked.

Bubbly.

Blobby.

Layered.

Rust-stained.

Rock particles trapped inside.

Those observations are more useful than guessing too quickly.


The Site Is Starting to Ask Questions

This undocumented site is becoming interesting because it is not giving me just one type of clue.

It is giving me several.

There is the rock shard with visible gold-coloured material.

There is the buttery yellow seam material between quartz and granite.

There is quartz with green colouring.

There is the shiny copper-coloured chunk.

There are possible flecks.

There are rocks with quartz veins.

There are strange silvery balls that need proper identification.

There are slag-like blobs with glassy patches, bubbles, pocks, trapped rock particles, and rusty colours.

There are heavier pieces that feel different from what I expect for their size.

None of those things alone would be enough to make a claim.

But together, they are enough to make me want to return.

The site is starting to ask questions, and I want to answer them properly.

That means more observation, more careful sampling, better photos, better labelling, and less rushing.


Keeping the Best Pieces Intact

One thing I am trying not to do is destroy the most interesting specimens too quickly.

Earlier in this journey, I probably would have been more tempted to smash everything apart, crush it down, pan it out, and see what happened.

I still may crush some material later.

But I do not want to rush that step with the best-looking pieces.

The rock shard with visible gold-coloured material is more useful to me intact for now. I can inspect it, photograph it, compare it under magnification, and possibly have someone more experienced look at it.

The yellow seam piece is also worth keeping intact for the moment, especially because the seam and surrounding iron staining are part of the story.

The same goes for the green-coloured quartz, copper-coloured chunk, and slag-like blobs.

If I decide to crush anything later, I will choose smaller or less visually important pieces first.

There is no point destroying the evidence before I understand it.


Safety Around Crushing Rock and Unknown Material

If I do decide to crush any of these rocks later, I need to approach it properly.

Quartz dust is not something I want to breathe in.

Crushing rock can create fine dust, and fine silica-containing dust is not something to treat casually.

That means no careless indoor rock crushing.

No smashing unknown material in a way that sends dust everywhere.

No heating or smelting strange material just because it looks interesting.

The same caution applies to the silvery balls and slag-like blobs.

Until I know more, they stay separate.

The gold experiment is meant to be a learning process, not a reason to be reckless.


What I Want to Check Next

The next step is to document these pieces properly.

That means I want to take better photos of each specimen, including:

  • The full rock or specimen
  • Close-up photos of the interesting area
  • Photos in sunlight
  • Photos in shade
  • Photos under magnification where possible
  • A scale reference, such as a ruler or coin
  • Notes on how each piece behaves when inspected

For the rock shard with visible gold-coloured material, I especially want clear photos that show how the colour sits on the rock.

For the yellow seam material, I want photos of the quartz, granite, seam, yellow material, and iron staining.

For the green quartz, I want close-ups of the green sections and the surrounding quartz.

For the copper-coloured chunk, I want photos from different angles so I can compare the shine, colour, and texture.

For the possible flecks, I want to inspect them again in good light and, if possible, under magnification.

For the silvery balls, I want to keep documenting behaviour without playing around with them unnecessarily.

For the slag-like blobs, I want clear wet and dry photos showing the bubbles, pocks, glassy surfaces, trapped rock particles, colours, and layering lines.

The goal is not to rush to a conclusion.

The goal is to build a better record.


Why This Find Feels Different

This outing feels different from some of the earlier ones.

The first smelting attempt was mostly a lesson in what not to do.

The early panning trips were about learning how hard it is to spot colour and how easy it is to be distracted by mica, rust, scrap metal, and other shiny things.

The tailings experiments taught me that even waste material can still be useful for technique practice.

But this undocumented site has now produced something that looks more like a proper specimen.

That changes the feeling of the project.

Not because I suddenly know what I am doing.

I definitely do not.

But because there is now something physical and visible that seems worth studying more carefully.

A shard of rock with possible gold on it is not a fortune.

But for a beginner learning the process, it is exciting.

Very exciting.


What I Learned From This Outing

This trip gave me several useful lessons.

The biggest ones were:

  • Some sites need more time before they are discussed publicly.
  • Visible colour on rock is worth documenting carefully.
  • A good-looking specimen should not be destroyed too quickly.
  • Yellow material that crumbles is probably not native gold, even if the colour is interesting.
  • Quartz with unusual colouring is worth observing, but not overhyping.
  • Copper-coloured material is not automatically copper.
  • Possible flecks matter more when they appear alongside other clues.
  • Iron staining and quartz seams are worth noting.
  • Strange silvery balls need careful handling and proper identification.
  • Slag-like blobs may tell part of the historical or geological story.
  • Not every unusual piece should be crushed immediately.
  • Careful photography may be just as important as collecting the sample.
  • The goal is to build evidence, not jump to conclusions.

That last point is probably the most important.

I want to be excited.

I am excited.

But I also want to stay honest.


Final Thoughts

This undocumented site has my attention now.

I am not ready to say too much about it. I am not ready to name it. I am not ready to make any big claims about it.

But I am ready to say that it produced one of the most interesting pieces I have found so far.

A small shard of rock with visible gold-coloured material.

A buttery yellow seam in quartz and granite.

Green-coloured quartz.

A shiny copper-coloured chunk.

A couple of possible flecks.

Strange silvery balls.

Slag-like blobs full of bubbles, pocks, glassy patches, trapped particles, and rusty colours.

Plenty of questions.

That is enough to make the site worth another careful look.

For now, the pieces are being kept aside, labelled, photographed, and treated as clues rather than conclusions.

No dream nugget.

No dramatic announcement.

No confirmed rich patch.

Just a handful of interesting rocks, strange materials, and a very strong reason to keep learning.

And honestly, that is enough to make this one of the most exciting steps in the gold experiment so far.


Part of the Gold Experiment Series

This post is part of my ongoing gold fossicking and smelting experiment series:

Learning Gold the Hard Way: Fossicking, Smelting, and Small-Scale Experiments

You can follow the full progress log on the main hub page, where I will continue adding updates as the experiment develops.


Posted on Leave a comment

WooCommerce Bulk Product Variations Pro: Reducing Repetitive Variation Editing

Anyone who has worked with WooCommerce variable products knows how repetitive the admin process can become.

A product may have several variations.
Then several pages of variations.
Then several similar products.
Then the same information needs to be entered again, and again, and again.

That is where WooCommerce Bulk Product Variations Pro comes in.

It is a Chrome extension created by Jays n Dees to help store owners bulk-edit supported WooCommerce variation fields, product-feed fields, and selected product-level fields from inside the WooCommerce admin area.

The Problem With Variable Product Editing

WooCommerce is powerful, but variable products can quickly become time-consuming.

If you sell products with multiple colours, sizes, styles, designs, or options, you may find yourself repeating the same work across many variation rows.

This might include:

  • entering similar variation descriptions
  • updating sale prices
  • setting sale start and end dates
  • adjusting stock status
  • preparing product-feed fields
  • entering Google for WooCommerce data
  • entering Pinterest-related data
  • applying product brand information

Doing this manually is possible, but it can become slow and frustrating.

The more variations you have, the more obvious the problem becomes.

What BPV Is Designed to Do

WooCommerce Bulk Product Variations Pro is designed to make supported repeated editing tasks quicker.

Instead of manually working through every variation field one at a time, BPV lets you configure the fields you want to update and apply those settings through the extension workflow.

It is especially useful when the information is repeated, structured, or only slightly different between variations.

BPV does not try to replace WooCommerce. It works inside the WooCommerce admin workflow and helps with selected fields that commonly create repetitive data-entry work.

Supported Field Areas

Depending on the licence tier, BPV can assist with:

  • Item Description
  • WooCommerce Sale Price
  • WooCommerce Sale Start Date
  • WooCommerce Sale End Date
  • WooCommerce Regular Price
  • WooCommerce Stock Status
  • Google for WooCommerce fields
  • Pinterest Condition
  • Product Brand Taxonomy support
  • reusable templates
  • plugin support suggestions

It is important to describe this accurately:

BPV edits variation-level fields, plus selected product-level fields such as Product Brand.

Product Brand support is product-level, not variation-level.

Lite, Standard, and Ultimate

BPV includes a Lite mode so users can try the basic workflow.

The paid tiers are designed around different levels of use.

Lite

Lite is the free base version.

It is suitable for basic testing and simple item description work.

Lite access is intentionally limited.

Standard

Standard is aimed at store owners who need more than the Lite workflow, but do not need every available feature.

Standard includes support for item descriptions, sale prices, sale dates, supported Google for WooCommerce fields, supported Pinterest fields, and Product Brand Taxonomy support.

Standard allows one activation.

Ultimate

Ultimate is for broader and heavier workflows.

Ultimate includes all currently supported BPV fields, including WooCommerce Regular Price and WooCommerce Stock Status, along with Description Builder access, Template Management, Plugin Support Suggestions, up to 10 saved item templates, and up to 4 activations.

Why Templates Matter

For stores with repeated product structures, templates can be very useful.

Instead of setting up the same description structure or repeated field values each time, Ultimate users can save item templates and reuse them across compatible workflows.

This can help reduce setup time when working through similar products.

For example, a store owner might have different templates for different product types, design styles, garment formats, or recurring product structures.

Plugin Settings and Field Groups

BPV includes a Plugin Settings area so users can enable or disable supported field groups based on the plugins they actually use.

Supported field groups currently include:

  • WooCommerce Core
  • Google for WooCommerce
  • Pinterest
  • Product Brand Taxonomy

This helps keep the Options page cleaner by only showing fields that are relevant to the current store setup and licence tier.

Why This Matters for Small Stores

For small store owners, time matters.

A repetitive task that only takes a few minutes per product can become a major time drain when repeated across many products.

BPV is intended to reduce that kind of friction.

It is not a magic one-click solution for every WooCommerce field, and it is not intended to replace careful product review. Store owners should still test changes on a small product first and confirm the result before applying the same workflow more widely.

But when the task fits BPV’s supported field set, it can make the editing process feel much less painful.

A Practical Tool for a Specific WooCommerce Problem

WooCommerce Bulk Product Variations Pro was built for a specific purpose:

To make repeated WooCommerce variation editing easier.

If your store uses variable products and you regularly enter similar information across multiple variations, BPV may help streamline part of that workflow.

The extension is available from the Chrome Web Store, with paid licence upgrades available through the Jays n Dees e-Store.

Posted on Leave a comment

Jays n Dees Has a New Look: The Story Behind Our Growing Family Brand

Sometimes a change of logo is just a change of logo. This one is a little different.

Over time, Jays n Dees has grown into something much broader than when we first started putting things online. The website now brings together our e-Store, software and digital products, crochet, clothing and gifts, the blog, and the many projects and experiments that find their way into our everyday lives.

The problem was that the way we presented Jays n Dees had not quite kept pace with what it had become.

So, over the past little while, we have been doing some fairly serious tidying up behind the scenes. Not only on the website, but across the Jays n Dees identity as a whole.

And now it is time to show you the result.

From jaysndees to Jays n Dees

The name itself has always been personal.

Jays n Dees comes from our family. It is not a name created by a marketing company, generated from a list of keywords, or designed around whatever happens to be popular this week. The Js and Ds have meaning to us, and as our family and the things we do have grown, the name has continued to fit.

What has changed is how we present it.

You may have known us online simply as jaysndees. That identity is not disappearing. You will still see it in places where a compact username or web address makes sense. Our website, for example, remains at jaysndees.com.au.

For the business itself, though, we are now presenting the name properly as Jays n Dees.

That small change makes a surprisingly big difference. It turns something that looked primarily like a username into the name of the family business it has gradually become.

A new logo with a lot more meaning

The most obvious part of the change is our new logo.

We wanted something that actually belonged to Jays n Dees rather than simply putting the name beside a generic symbol. The final design brings together an interlocking J and D, surrounded by a circular, orbit-like design with a collection of individual coloured dots.

There is a fair bit of personal meaning tucked into it.

The circle reflects connection, movement and the way the different parts of Jays n Dees keep coming back to the same centre. The individual dots reflect the family behind it – different people, personalities and stages of life, but all part of the same rather busy orbit.

There are a few little details in there whose complete meanings we are keeping to ourselves for now. Some things are more fun when their story gets told at the right time.

What matters publicly is that, for the first time, the logo feels like a proper representation of us rather than just a label attached to a website.

The website has been getting a clean-up too

The logo was only one piece of a much larger tidy-up.

Jays n Dees has accumulated a lot over the years. That is what happens when the same website becomes home to a shop, a blog, software projects, digital products, crochet patterns, family stories, experiments and whatever else we happen to be working on.

Eventually, adding one more thing here and another thing there starts making the whole place harder to understand.

So we stepped back and looked at the website from the perspective of somebody arriving for the first time.

The e-Store is now the main focus of the website, and the navigation has been simplified to make the different parts of the shop easier to find. Products are organised more clearly into areas such as Clothing and Gifts, Crochet, and Software and Digital Products, while the blog remains its own part of Jays n Dees for anyone who is here for the stories, experiments and occasional detours.

We have also been doing plenty of less-visible work – cleaning up older content, tidying product listings, improving descriptions, removing things that no longer belong, and generally making sure the site better represents what Jays n Dees is today.

There is still more to do. There probably always will be. A website attached to an active family and a growing collection of projects is never really “finished”.

But it now has a much clearer direction.

Jays n Dees is getting a little more social

This might be the part that feels strangest for us!

Jays n Dees has never been built around being constantly visible on social media. We are much more comfortable making things, building things, writing about things and experimenting behind the scenes than trying to turn every moment into a social media performance.

That is not going to change.

What is changing is that we now have a more consistent presence outside the website. Jays n Dees can now be found on Facebook and Instagram, alongside our existing Pinterest presence.

The intention is not to suddenly fill everybody’s feeds for the sake of posting something. We would rather use those channels to share new products, useful posts, project updates and the occasional glimpse of what is happening around Jays n Dees when there is actually something worth sharing.

In other words, we are becoming more social – just in our own way.

One name for a lot of different things

One of the challenges in redesigning Jays n Dees was deciding whether all of our different interests really belonged together.

After thinking about it, we realised that the variety is actually the point.

We develop software such as Screen Region Blockout and WooCommerce Bulk Product Variations. We create digital products. We have crochet projects and patterns. We sell physical items. The blog can wander from family systems and online income experiments to DIY projects, technology and learning our way through gold fossicking and processing.

On paper, that can look like a strange collection.

In real life, though, it makes perfect sense because that is what Jays n Dees has always been – a collection of things we genuinely make, use, learn, test or experience ourselves.

The new branding is not an attempt to make all of those things identical. It is intended to give them a common home.

What happens from here?

The refreshed Jays n Dees is not the end of something. It is really a better starting point for what comes next.

There are software projects under active development, existing products continuing to evolve, plenty more ideas waiting their turn, and more stories from everyday family life that will inevitably find their way onto the blog.

There is also another little girl preparing to join the family before too long, so life behind Jays n Dees certainly is not about to become quieter.

For now, though, we are happy to have reached a point where the website, logo and public identity finally feel like they belong to the same thing.

So, welcome to the refreshed Jays n Dees.

Same family. Same curiosity. Same tendency to have far too many projects happening at once.

Just a much better home for all of it.