

Posted on Leave a comment

Nicest Code: A Local HTML Code Cleaner for Copied Content

Copying formatted content should be simple.

You select the content you want, copy it, paste it into a website or editor, and continue working.

Unfortunately, the HTML behind that content can be far less simple.

Content copied from AI platforms, visual editors and other web interfaces may contain presentation metadata, generated class names, interface-specific attributes, unnecessary wrappers and excessive whitespace. Much of it is invisible in the visual editor, but it becomes obvious when the HTML source is inspected.

That is the problem Nicest Code was created to address.

Nicest Code is a local HTML code cleaner for Chrome. It removes approved presentation metadata and whitespace clutter while preserving the source you intended to keep.

It does not send copied source to Jays n Dees for cleaning, rewrite the entire document or guess which code might be unnecessary. Instead, it applies targeted rules and gives you the opportunity to inspect every change.

Why Copied HTML Can Become Messy

When content is copied from a web interface, the clipboard may contain more than the visible headings, paragraphs, lists and links.

Depending on the source, copied HTML can include:

  • generated data-* attributes
  • presentation-related class tokens
  • interface-specific wrappers
  • accessibility or directionality attributes
  • empty elements
  • excessive blank lines and spacing
  • metadata used only by the original platform
  • structures added during copying rather than intentionally written

Some of this markup may be useful. Some may be harmless. Some may create unwanted styling or leave the destination source filled with information that does not belong there.

The difficult part is not merely removing code.

The difficult part is removing only what has been approved for removal.

A Non-Destructive Cleaning Workflow

Nicest Code keeps the untouched Original source separate from the Modified result.

Source can be added by:

  • pasting from the clipboard
  • opening a supported file
  • dragging a supported file into the extension

The original remains available for comparison while the selected cleanup rules are applied to a separate working copy.

This makes the process reviewable. You can inspect the result, read the change report and decide whether to copy or save the modified source.

Nicest Code does not overwrite the original file. Its Save As workflow creates a separate cleaned copy.

General HTML Cleanup

The General HTML Cleanup preset provides a controlled starting point for source that contains common presentation clutter.

Depending on the selected options, it can assist with:

  • targeted attribute removal
  • complete class-token removal
  • approved empty-element cleanup
  • excess whitespace reduction
  • selected semantic controls
  • selected directionality controls

The available controls vary by licence edition.

The purpose is not to produce the shortest possible source. It is to remove selected clutter while preserving the underlying content and structure.

Evidence-Based Platform Presets

Different platforms can introduce different copying artefacts.

Nicest Code includes presets developed from controlled source-copy testing rather than assumptions about what a platform might produce.

The free Lite edition includes:

  • General HTML Cleanup
  • Copied ChatGPT HTML

Standard and Ultimate add presets for:

  • Gemini
  • Claude
  • Perplexity

These presets target patterns observed during controlled copying tests. They are not intended to remove every attribute or class appearing in a document.

Targeted Attribute and Class Removal

Nicest Code distinguishes between an attribute and an individual class token.

For example, an element may contain several classes:

<section class="sample-card featured generated-wrapper">

A targeted rule can remove the complete generated-wrapper token without deleting the entire class attribute or altering sample-card and featured.

This matters when part of a class list is intentional and part was introduced by the copying platform.

Standard and Ultimate also provide custom quick-removal fields for supported targeted cleanup tasks.

Protection for PHP, Scripts and Styles

HTML files do not always contain HTML alone.

A PHP template may include server-side blocks. A document may also contain JavaScript inside a script element or CSS inside a style element.

Nicest Code protects:

  • PHP blocks
  • script contents
  • style contents

It does not attempt to format PHP, JavaScript or CSS.

This is deliberate. Nicest Code is an HTML source cleaner, not a general-purpose code formatter or speculative code-rewriting system.

Detailed Change Reports

Cleaning source without knowing what changed can create a different kind of problem.

Nicest Code produces a numbered change report showing the targeted modifications it made. Reports include original source line references to help locate affected content.

This makes it easier to answer practical questions such as:

  • Which attribute was removed?
  • Which class token was deleted?
  • Where did an empty element occur?
  • What whitespace cleanup was applied?
  • Did a particular preset make any changes?

If no supported changes are required, the extension reports that outcome rather than pretending work was performed.

Undo, Reset, Copy and Save

The cleaning workflow includes controls for reviewing and managing the result:

  • Undo reverses the most recent supported change operation.
  • Reset restores the working result from the untouched Original.
  • Clear removes the current source from the workspace.
  • Copy places the Modified source on the clipboard.
  • Save As creates a separate cleaned file without replacing the original.

These controls are intended to keep the user in charge of the source throughout the process.

Lite, Standard and Ultimate

Nicest Code can be installed and used in Lite mode without a licence key.

FeatureLiteStandardUltimate
General HTML CleanupIncludedIncludedIncluded
Copied ChatGPT HTML presetIncludedIncludedIncluded
Original and Modified comparisonIncludedIncludedIncluded
Change reports and source line referencesIncludedIncludedIncluded
Undo, Reset, Copy and Save AsIncludedIncludedIncluded
Gemini, Claude and Perplexity presetsUnavailableIncludedIncluded
Semantic and directionality controlsUnavailableIncludedIncluded
Custom quick-removal fieldsUnavailableIncludedIncluded
Make the Nicest Code modeUnavailableIncludedIncluded
Local batch processingUnavailableUnavailableIncluded
Provider-evidence detectionUnavailableUnavailableIncluded
Custom rule packsUnavailableUnavailableIncluded

Standard supports one activated installation.

Ultimate supports up to ten activated installations and adds local batch processing for up to 100 supported files or a combined total of 50 MB. It can also produce combined reports, create cleaned ZIP downloads and manage custom rule packs.

Standard and Ultimate are optional lifetime licence upgrades.

Local Processing and Privacy

Source pasted into Nicest Code, opened from a file or added through drag-and-drop is processed locally on the device.

The source is not sent to Jays n Dees for cleaning.

Settings are also stored locally.

Paid-edition licence operations require limited communication with the Jays n Dees licensing service. These requests contain only the information needed to perform the licensing action, such as the licence credentials, a random installation identifier, the extension version and the requested action.

The complete handling details are available in the Jays n Dees Privacy Policy.

What Nicest Code Does Not Do

Nicest Code is purposefully limited.

It does not:

  • rewrite the entire document
  • reserialise all supplied HTML
  • format PHP
  • format JavaScript
  • format CSS
  • remove arbitrary code because it appears unnecessary
  • decide whether your content is factually correct
  • repair every possible HTML error
  • replace manual review

The extension removes supported artefacts according to selected rules. The user remains responsible for reviewing the result and confirming that it is suitable for the intended destination.

Nicest Code is one of several focused Jays n Dees browser extensions, each designed to solve a specific practical problem.

Supported Files

Nicest Code supports the following source file types:

  • HTML
  • HTM
  • PHP
  • TXT

Google Chrome with Manifest V3 extension support is required.

A network connection is only required for paid-edition licence activation and periodic licence verification. The source-cleaning process itself remains local.

Who Is Nicest Code For?

Nicest Code may be useful for:

  • WordPress users working in the Code Editor
  • website owners copying formatted AI responses
  • developers reviewing copied HTML fragments
  • content managers moving material between platforms
  • testers comparing source-copy behaviour
  • anyone who wants cleaner copied HTML without surrendering control of the source

It is particularly useful when the visible content looks correct but the underlying HTML contains unexplained metadata or presentation clutter.

Nicest Code Is Now Available

Nicest Code v0.8.0 is now available from the Chrome Web Store.

The free Lite edition includes the complete core single-source workflow, General HTML Cleanup and the Copied ChatGPT HTML preset.

Standard and Ultimate lifetime licence upgrades are available through the Jays n Dees e-Store for users who need additional presets, controls, batch processing or custom rule packs.

Install Nicest Code from the Chrome Web Store

View Nicest Code Standard and Ultimate licence upgrades

Copied HTML does not always need to be completely rewritten.

Sometimes it just needs a careful, transparent clean.

Posted on Leave a comment

A Simple 2-Stroke Fuel Mix Calculator for Everyday Equipment

Mixing fuel for a 2-stroke engine is not particularly complicated.

At least, it should not be.

You have a quantity of fuel, a required fuel-to-oil ratio, and an amount of 2-stroke oil that needs to be added. The calculation itself is straightforward, but it becomes surprisingly easy to second-guess when you are standing beside a mower, chainsaw, brushcutter, blower or another piece of equipment with a fuel container in front of you.

Was that 25:1 or 40:1?

How much oil is needed for this amount of fuel?

Was the measurement calculated using litres, US gallons or UK gallons?

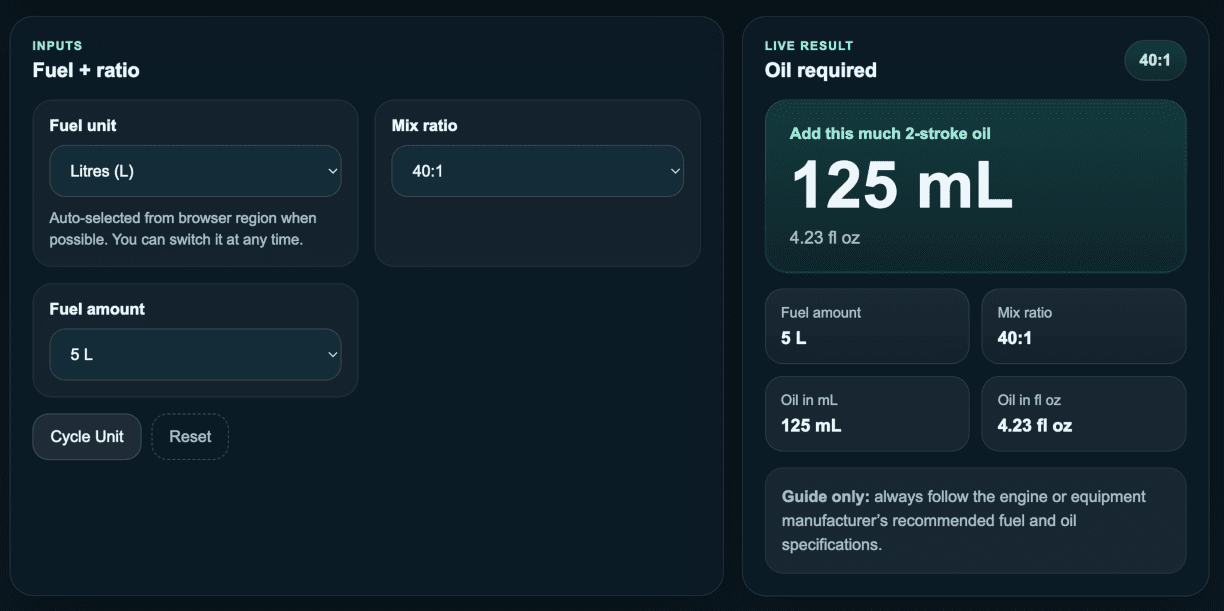
Rather than repeatedly looking up conversion tables or reaching for a calculator, I created the Jays n Dees 2-Stroke Fuel Mix Calculator.

What the Calculator Does

The calculator works out how much 2-stroke oil is required for a selected amount of fuel and fuel-to-oil ratio.

You choose:

  • the unit used to measure the fuel
  • the required mixing ratio
  • the amount of fuel being prepared

The calculator then displays the corresponding oil quantity.

It supports:

  • litres
  • US gallons
  • UK gallons
  • common fuel-to-oil ratios
  • custom ratios
  • preset fuel quantities
  • custom fuel quantities

This means it can be used with a range of equipment and measuring systems without manually converting everything first.

Why the Different Gallon Types Matter

One reason fuel calculations can become confusing is that a gallon is not always the same quantity.

A US gallon and a UK imperial gallon are different sizes. Using the wrong gallon measurement can therefore produce the wrong oil quantity, even when the mixing ratio itself is correct.

The calculator treats litres, US gallons and UK gallons as separate units.

Where possible, it uses the browser region to select a likely starting unit, but that selection can be changed at any time. There is also a Cycle Unit button for quickly moving between the available measurement systems.

Common and Custom Mixing Ratios

Many pieces of 2-stroke equipment use familiar ratios such as 25:1, 40:1 or 50:1.

The calculator provides common ratio choices for convenience, but it is not limited to those options. A custom ratio can be entered when a particular engine or manufacturer specifies something different.

For example, entering 25 represents a fuel-to-oil ratio of 25:1.

This flexibility is useful because not every 2-stroke engine uses the same mixture. Older equipment, newer equipment and specialised engines may all have different requirements.

The calculator does not attempt to decide which ratio your equipment needs. That information must come from the equipment manufacturer, instruction manual or another reliable specification for the engine.

Its job is to calculate the oil quantity after you provide the correct ratio.

Saving Frequently Used Mixtures

Most people who regularly use 2-stroke equipment tend to prepare the same few mixtures repeatedly.

You may always mix:

  • the same fuel quantity
  • in the same unit
  • at the same ratio

The calculator allows useful combinations to be saved as favourites for quicker reuse.

These favourites are stored locally on the device rather than being attached to an online account. This keeps the feature simple and avoids requiring registration merely to save a common calculation.

Once saved, a favourite can be selected again without rebuilding the mixture from the beginning.

Available Online and Offline

The calculator is built as an installable Progressive Web App, commonly shortened to PWA.

That means it can be opened through a web browser and, on supported devices and browsers, installed for more app-like access. It is also designed to remain available offline after it has been loaded and installed correctly.

Offline access is particularly useful for this kind of tool.

Two-stroke equipment is often used in sheds, gardens, paddocks, workshops and other places where an internet connection may be weak or unavailable. A calculator that stops working when the connection disappears would be far less useful.

The saved favourites also remain on the device for convenient reuse.

A Small Tool for a Specific Job

The 2-Stroke Fuel Mix Calculator is deliberately focused.

It is not an equipment-management platform, maintenance tracker or complicated workshop system. It does not require an account, and it does not try to recommend a mixing ratio without knowing the engine involved.

It performs one practical job:

It calculates the amount of 2-stroke oil required for the fuel quantity and ratio you select.

Sometimes that is all a tool needs to do.

Always Check the Manufacturer’s Requirements

The calculator is provided as a mixing guide.

Always confirm the correct fuel type, oil type and fuel-to-oil ratio specified by the engine or equipment manufacturer before preparing a mixture.

Using the wrong ratio or unsuitable oil may affect performance or damage equipment. If the instructions printed on the equipment differ from information found elsewhere, follow the applicable manufacturer documentation.

Once the correct ratio is known, the calculator can take care of the maths behind it.

Try the Free Calculator

The Jays n Dees 2-Stroke Fuel Mix Calculator is available free through the Jays n Dees website.

Open the 2-Stroke Fuel Mix Calculator

Choose the fuel unit, select or enter the required ratio, enter the amount of fuel, and the calculator will show how much oil to add.

Save the combinations you use regularly, and the next mixture should take only a few moments to calculate.

Posted on Leave a comment

WooCommerce Bulk Product Variations Pro: Reducing Repetitive Variation Editing

Anyone who has worked with WooCommerce variable products knows how repetitive the admin process can become.

A product may have several variations.
Then several pages of variations.
Then several similar products.
Then the same information needs to be entered again, and again, and again.

That is where WooCommerce Bulk Product Variations Pro comes in.

It is a Chrome extension created by Jays n Dees to help store owners bulk-edit supported WooCommerce variation fields, product-feed fields, and selected product-level fields from inside the WooCommerce admin area.

The Problem With Variable Product Editing

WooCommerce is powerful, but variable products can quickly become time-consuming.

If you sell products with multiple colours, sizes, styles, designs, or options, you may find yourself repeating the same work across many variation rows.

This might include:

  • entering similar variation descriptions
  • updating sale prices
  • setting sale start and end dates
  • adjusting stock status
  • preparing product-feed fields
  • entering Google for WooCommerce data
  • entering Pinterest-related data
  • applying product brand information

Doing this manually is possible, but it can become slow and frustrating.

The more variations you have, the more obvious the problem becomes.

What BPV Is Designed to Do

WooCommerce Bulk Product Variations Pro is designed to make supported repeated editing tasks quicker.

Instead of manually working through every variation field one at a time, BPV lets you configure the fields you want to update and apply those settings through the extension workflow.

It is especially useful when the information is repeated, structured, or only slightly different between variations.

BPV does not try to replace WooCommerce. It works inside the WooCommerce admin workflow and helps with selected fields that commonly create repetitive data-entry work.

Supported Field Areas

Depending on the licence tier, BPV can assist with:

  • Item Description
  • WooCommerce Sale Price
  • WooCommerce Sale Start Date
  • WooCommerce Sale End Date
  • WooCommerce Regular Price
  • WooCommerce Stock Status
  • Google for WooCommerce fields
  • Pinterest Condition
  • Product Brand Taxonomy support
  • reusable templates
  • plugin support suggestions

It is important to describe this accurately:

BPV edits variation-level fields, plus selected product-level fields such as Product Brand.

Product Brand support is product-level, not variation-level.

Lite, Standard, and Ultimate

BPV includes a Lite mode so users can try the basic workflow.

The paid tiers are designed around different levels of use.

Lite

Lite is the free base version.

It is suitable for basic testing and simple item description work.

Lite access is intentionally limited.

Standard

Standard is aimed at store owners who need more than the Lite workflow, but do not need every available feature.

Standard includes support for item descriptions, sale prices, sale dates, supported Google for WooCommerce fields, supported Pinterest fields, and Product Brand Taxonomy support.

Standard allows one activation.

Ultimate

Ultimate is for broader and heavier workflows.

Ultimate includes all currently supported BPV fields, including WooCommerce Regular Price and WooCommerce Stock Status, along with Description Builder access, Template Management, Plugin Support Suggestions, up to 10 saved item templates, and up to 4 activations.

Why Templates Matter

For stores with repeated product structures, templates can be very useful.

Instead of setting up the same description structure or repeated field values each time, Ultimate users can save item templates and reuse them across compatible workflows.

This can help reduce setup time when working through similar products.

For example, a store owner might have different templates for different product types, design styles, garment formats, or recurring product structures.

Plugin Settings and Field Groups

BPV includes a Plugin Settings area so users can enable or disable supported field groups based on the plugins they actually use.

Supported field groups currently include:

  • WooCommerce Core
  • Google for WooCommerce
  • Pinterest
  • Product Brand Taxonomy

This helps keep the Options page cleaner by only showing fields that are relevant to the current store setup and licence tier.

Why This Matters for Small Stores

For small store owners, time matters.

A repetitive task that only takes a few minutes per product can become a major time drain when repeated across many products.

BPV is intended to reduce that kind of friction.

It is not a magic one-click solution for every WooCommerce field, and it is not intended to replace careful product review. Store owners should still test changes on a small product first and confirm the result before applying the same workflow more widely.

But when the task fits BPV’s supported field set, it can make the editing process feel much less painful.

A Practical Tool for a Specific WooCommerce Problem

WooCommerce Bulk Product Variations Pro was built for a specific purpose:

To make repeated WooCommerce variation editing easier.

If your store uses variable products and you regularly enter similar information across multiple variations, BPV may help streamline part of that workflow.

The extension is available from the Chrome Web Store, with paid licence upgrades available through the Jays n Dees e-Store.

Posted on Leave a comment

Screen Region Blockout: A Simple Way to Hide the Parts of a Webpage You Do Not Want to See

Sometimes, the problem with a webpage is not the whole webpage.

Sometimes it is one section.

A sidebar.
A comment box.
A distracting image.
A live chat widget.
A price panel.
A suggested-content feed.
A piece of information you do not want visible while recording, sharing your screen, working around others, or simply trying to focus.

That is the basic idea behind Screen Region Blockout.

It is a Chrome extension created by Jays n Dees that lets you block out selected regions of a webpage. Instead of trying to change the entire site, you choose the area you want hidden and apply a visual blockout effect.

Why Screen Region Blockout Exists

Most browser tools work at the page level.

They block ads.
They hide trackers.
They change themes.
They remove elements.
They modify full pages.

Screen Region Blockout takes a more practical, visual approach.

It lets you select a specific part of the page and cover it, without needing to edit the website itself. This can be useful when the page is technically fine, but one part of it is distracting, sensitive, unnecessary, or simply in the way.

A Few Everyday Uses

Screen Region Blockout may be useful for:

  • hiding sensitive information before screen sharing
  • covering distracting webpage areas while working
  • blocking sections during demonstrations or tutorials
  • hiding comment areas, sidebars, or suggested content
  • reducing visual clutter on frequently used pages
  • keeping certain on-screen information out of view around others

It is not designed to be an ad blocker, and it is not intended to replace privacy or security software. It is a visual blockout tool for selected areas of a webpage.

How It Works

The workflow is simple.

Open a webpage, activate the extension, then select the region you want to block out.

Depending on the settings available to your licence tier, you can apply different visual effects such as blur, solid colour, or pixelation. The extension stores your selected regions so they can be restored when you return to the same page.

That means you can set up a page once and keep using it with the same blockout layout later.

Lite and Paid Licence Options

Screen Region Blockout includes a Lite version so users can test the basic workflow before upgrading.

Paid licence options unlock broader use, depending on the tier selected. This allows the extension to remain useful as a free tool while also supporting larger or more advanced workflows for people who need more flexibility.

The paid licences are available through the Jays n Dees e-store.

Why This Is Useful for Screen Sharing

One of the strongest use cases for Screen Region Blockout is screen sharing.

It is easy to forget how much information is visible on a page until someone else is watching. Browser tabs, account panels, usernames, balances, messages, customer details, sidebar widgets, and other small page areas can all become visible at the wrong moment.

Screen Region Blockout gives you a simple way to cover only the area that matters.

This can be useful for:

  • online meetings
  • tutorial recordings
  • product demonstrations
  • support sessions
  • livestream preparation
  • working in shared spaces

It does not replace proper security habits, but it can add a useful visual privacy layer.

Why This Is Useful for Focus

The other major benefit is focus.

Some pages are full of content designed to pull your attention away from the thing you opened the page to do. Related articles, recommended posts, sidebars, popups, account boxes, comments, and visual clutter can make it harder to stay on task.

With Screen Region Blockout, you can visually remove those areas from your working view.

You are not changing the website permanently. You are simply making it easier to use the page in the way that suits you.

A Small Tool With a Specific Job

Screen Region Blockout is not trying to be a massive productivity suite.

It does one clear thing:

It lets you block selected regions of a webpage.

For the right kind of user, that can be surprisingly useful.

If you regularly work with webpages that contain distracting, sensitive, or unnecessary visual areas, Screen Region Blockout may be worth trying.

Where to Get It

Screen Region Blockout is available through the Chrome Web Store.

Paid licence upgrades are available through the Jays n Dees e-store.

If you want a simple way to cover selected parts of a webpage without editing the website itself, Screen Region Blockout was built for exactly that kind of job.

Posted on Leave a comment

Moon Planting in the Southern Hemisphere: A Practical Overview

Moon planting is a traditional approach to gardening that uses the phases of the moon as a planning reference for different types of garden work. It’s often discussed in broad terms, but when you start looking for practical guidance – especially in the Southern Hemisphere – the information can quickly become confusing.

This post provides a clear, practical overview of moon planting as it applies to the Southern Hemisphere, with an emphasis on using it as a planning aid rather than a strict rulebook.

What Is Moon Planting?

Moon planting is based on the observation that the moon’s cycles appear to coincide with natural rhythms in growth, moisture, and biological activity. Traditionally, different moon phases have been associated with different types of gardening tasks.

It’s important to frame this correctly:

  • moon planting is a traditional and observational practice
  • it is not a guarantee of outcomes
  • it works best when combined with local knowledge and experience

Many gardeners use moon planting not to dictate what must be done, but to help decide when to do things they already intend to do.

Why Moon Planting in the Southern Hemisphere Needs a Different Approach

One of the biggest sources of confusion around moon planting is that much of the available guidance assumes Northern Hemisphere seasons.

In the Southern Hemisphere:

  • seasons are inverted
  • month-to-season relationships differ
  • climate variation is significant even within the same country

This means that simply following a Northern Hemisphere moon planting chart can lead to mismatches between lunar advice and actual growing conditions.

For Southern Hemisphere gardeners, moon planting guidance only becomes useful when it is interpreted in context, rather than followed verbatim.

Moon Phases and General Gardening Activities in Moon Planting

Rather than rigid rules, most moon planting traditions associate moon phases with types of activity. These associations are best treated as planning cues, not instructions.

New Moon

Often associated with:

  • planning and preparation
  • soil improvement
  • light sowing of leafy crops

This phase is commonly treated as a starting point in the lunar cycle.

Waxing Moon

Typically linked to:

  • above-ground growth
  • planting or transplanting
  • encouraging leafy development

Gardeners who follow moon planting often use this phase for activities that benefit from upward growth.

Full Moon

Often associated with:

  • observation and harvesting
  • seed collection
  • general garden maintenance

Rather than intensive planting, this phase is frequently treated as a checkpoint in the cycle.

Waning Moon

Commonly linked to:

  • root crops
  • pruning
  • weeding
  • composting and soil work

The waning phase is often used for tasks that focus below ground or involve reducing growth.

Using Moon Planting as a Planning Aid in the Southern Hemisphere

The most practical way to approach moon planting is to treat it as one input among many, rather than a deciding factor on its own.

Effective gardening decisions still depend on:

  • local weather conditions
  • soil quality
  • plant varieties
  • seasonal timing
  • available time and energy

Moon planting can help structure when you do certain tasks, but it shouldn’t override real-world constraints.

Many experienced gardeners find moon planting most useful when it:

  • reduces indecision
  • creates a rhythm for planning
  • encourages observation over time

    This overview focuses on how moon planting is commonly interpreted in Southern Hemisphere contexts, rather than promoting it as a set of fixed rules.

A Note on Calendars, Charts, and Tools

Static moon planting charts can be helpful as a reference, but they also have limitations.

Common issues include:

  • lack of localisation
  • assumptions about climate
  • fixed rules that don’t adapt well

For gardeners who want consistency without rigidity, systems that separate data (moon phases, seasons) from decisions tend to work better than fixed guides.

This approach allows moon planting to support planning without becoming prescriptive.

Building a Reusable Approach

While this post focuses on understanding moon planting in general terms, it’s often helpful to translate that understanding into a repeatable structure.

To reduce repeated interpretation, I eventually documented how I built a simple moon planting system specifically for the Southern Hemisphere, focused on planning rather than prediction. That project is covered in detail here:

Building a Moon Planting System for the Southern Hemisphere

This case study explains how the information above was organised into a reusable framework, and why flexibility was prioritised over rigid rules.

Final Thoughts

Moon planting in the Southern Hemisphere, and especially Australia, works best when approached thoughtfully.

Rather than asking whether it “works” in absolute terms, a more useful question is:

Does this help me plan my gardening activities more clearly and consistently?

Used as a planning aid – alongside observation, experience, and local conditions – moon planting can provide structure without adding complexity.

As with most long-term gardening practices, its value tends to come not from strict adherence, but from paying attention over time.


RELATED ARTICLES:

Posted on Leave a comment

Building a Moon Planting System for the Southern Hemisphere

Moon planting in the Southern Hemisphere is one of those practices that sits at the intersection of tradition, observation, and personal experimentation. It’s widely referenced, frequently debated, and often presented as a fixed set of rules.

What I found, however, was that most moon planting guidance is either:

  • written with the Northern Hemisphere in mind, or
  • fragmented across charts, blogs, and almanacs, or
  • too vague to be used consistently in day-to-day planning

This project didn’t start as an attempt to “prove” or “disprove” moon planting. It started as a much simpler problem:

I wanted a structured, Southern Hemisphere-appropriate way to plan gardening activities without constantly researching the same information.

So instead of bookmarking advice, I decided to build a small system.

The Problem With Advice for Moon Planting in the Southern Hemisphere

Moon planting is often presented as universal, but most practical guides quietly assume:

  • Northern Hemisphere seasons
  • temperate climates
  • static month-to-season relationships

For gardeners in the Southern Hemisphere, especially in regions like Australia, this creates friction.

You’ll often see advice that:

  • references “spring” without clarifying hemisphere
  • aligns planting suggestions to months that don’t match local seasons
  • mixes lunar phases with climate assumptions that simply don’t apply

None of this makes the practice unusable – but it does make it hard to rely on without constant interpretation.

Over time, that interpretation cost more mental effort than it was worth.

Why I Built a Moon Planting System Instead of Following a Guide

I didn’t want:

  • a single printable chart
  • a generic calendar graphic
  • another set of rules to memorise

What I wanted was:

  • something location-aware
  • something repeatable year to year
  • something that separated data from decisions

In other words, I wanted a system that could:

  • tell me what phase the moon is in
  • align that phase to a Southern Hemisphere context
  • let me decide what to do with that information

This is consistent with how I approach most long-running projects:
build structure first, interpretation second.

How the Moon Planting System Is Structured for the Southern Hemisphere

At its core, the system is intentionally simple.

It separates the project into a few distinct layers:

1. Time and Location Data

  • Year-specific moon phase dates
  • Southern Hemisphere season alignment
  • Regional climate assumptions (broad, not hyper-local)

This avoids hard-coding advice into fixed months.

2. Phase Classification

Each lunar phase is treated as a planning signal, not a command.

For example:

  • new moon periods are associated with preparation and planning
  • waxing phases align with above-ground growth activities
  • waning phases suggest maintenance or root-focused work

These associations are descriptive, not prescriptive.

3. Interpretation Layer

This is where flexibility lives.

The system doesn’t tell you what you must plant.
It gives you a consistent framework you can interpret alongside:

  • weather forecasts
  • soil conditions
  • plant varieties
  • personal timing constraints

That separation is deliberate.

What the Moon Planting System Does – and What It Doesn’t

This project is designed to support planning, not outcomes.

What it does:

  • provides a structured view of lunar phases
  • aligns them correctly for the Southern Hemisphere
  • reduces repeated research and decision fatigue
  • creates consistency across seasons and years

What it doesn’t do:

  • guarantee plant health or yield
  • override climate, soil, or care practices
  • replace observation or experience
  • claim scientific certainty

Moon planting, like many traditional practices, works best when treated as one input among many, not a rulebook.

Lessons Learned While Building the Moon Planting System

A few things became clear as this project evolved:

  • Local context matters more than theory
    Even within the Southern Hemisphere, climate differences are significant.
  • Rigid rules don’t scale
    Any system that demands strict adherence quickly breaks down in real life.
  • Structure reduces cognitive load
    Having the information organised removes the mental friction of constantly re-checking sources.
  • Simplicity survives longer
    The less the system tries to “decide for you,” the more useful it remains.

These lessons mirror patterns I’ve seen in completely unrelated projects – from technical systems to everyday routines.

How This Fits Into My Broader Approach

This moon planting project sits comfortably alongside other work I’ve documented here.

The common thread isn’t gardening. It’s systems thinking:

  • building frameworks that work under imperfect conditions
  • reducing unnecessary decisions
  • creating tools that support consistency rather than optimisation

Whether it’s planning a garden, managing a project, or structuring a routine, the goal is the same:

build something simple enough to keep using.

Where the Project Is Headed

At the moment, this system is primarily for personal use.

Possible future directions include:

  • expanding datasets to cover multiple Australian regions
  • refining seasonal assumptions for different climates
  • keeping it as a private planning tool rather than a public guide

There’s no rush to turn it into anything more than it needs to be.
That restraint is intentional.

Final Thoughts

The moon planting in the southern hemisphere project wasn’t about validating a belief or creating a definitive guide. It was about solving a practical problem:

How do I organise scattered information into something I can actually use?

Moon planting provided the context, but the real outcome was a reusable system – one that reduces friction, respects local conditions, and leaves room for judgement.

That, more than any specific planting recommendation, is what made the project worthwhile.


Image showing the dashboard of the Moon Planting in the Southern Hemisphere. Moon gardening in Australia 2026.
Image showing the plant dictionary of the Moon Garden Project. Moon gardening in Australia 2026.
Image showing a journal entry of the Moon Garden Project. Moon gardening in Australia 2026.
Image showing the visual calendar of the Moon Planting in the Southern Hemisphere. Moon gardening in Australia 2026.

If you would like to try out the Moon Garden Project, you can do so by navigating to the following link:
https://jaysndees.com.au/moon/index.html

Bookmark the link, install the app by using the icon that will appear beside the URL bar, enable the notifications (and allow them too if requested), and you will have your very own, self sufficient Moon Gardening reference!

If you have any questions, suggestions, comments, or feedback, please use our Contact Us form .

Good luck, and many happy moon gardening in Australia 2026 adventures!

This post documents a personal project, not gardening advice.


RELATED ARTICLES: